Connecticut: Snickerdoodles

First of all, I’m sorry it’s been so long since my last post. I had to take a break because I was getting a few too many tastes of the desserts. I was getting high on my own supply.

I actually prepared the dessert for Connecticut about a month ago and just hadn’t gotten around to writing a post. So to make sure I actually complete this, I’ll be brief.

The state cookie of Connecticut is the Snickerdoodle, so I didn’t want to overthink what dessert I would do for this state. If you think about Connecticut, it’s mostly known for white people and more white people (WASPS) and white people love Snickerdoodles. But also, who doesn’t love Snickerdoodles?

When working with a cookie recipe the first place I check is Cookie Love by Mindy Segal. If you thought you were a cookie expert, I’m here to tell you that you’re wrong. This book has all the cookies you could want (drop, sandwich, shortbread, bars, etc.) with precise directions to teach you a thing or two about serious baking. I once baked her Butterscotchies for a class in college, and my classmates were so impressed they ordered copies on their phones. I should be getting that commission.

Without further ado, I give you Mindy’s recipe. I’m so lazy, here is it from the book, sourced from an interview you can read here  I’m not rewriting it because her version is great and honestly I’m just trying to complete this state already. Make sure you read this thoroughly. Follow the directions to the letter and you’ll be overjoyed.

cookie_spreads_for_eater_Page_1.0

20891539_10211455939087523_889394503_n.jpg

California: Avocado Lemon Cake

It’s been awhile since I was last in California (fifteen years? Maybe?) I was supposed to go last fall but the trip got cancelled at the last minute.

The last time I went was when I was about 8 or 9 years old. I went with my dad to visit his best friend in San Francisco. We went to the Wharf (where we went to the Ghiradelli store—great place for a chocolate obsessed child), and I went down hard with a unexplained fever. I was in second grade and had just found out how dope “Frog and Toad” is/was. So my dad and I read “Frog and Toad” while my uncle gave me a pedicure (he used a 3 inch blade to clean my cuticles—its all true).

Because of how impressionable I was, you may think I would go with a Ghiradelli centered recipe. In fact, I’m going in the complete opposite direction: citrus. PSA never mix chocolate with citrus, if you like that it’s dumb and you can’t come to my party at the lake house.

If there is one thing I have learned about Californians over the many years I’ve spent aggressively watching House Hunters like it’s my damn job, its that they love lemon trees and adore avocado trees. Plus everyone knows that California is known for fad diets like paleo, gluten free (when people don’t even have a gluten allergy…) vegan, caveman, etc. So making a recipe with some healthy compromises made a lot of sense. Especially since I’ve made a few avocado desserts and they were A+ status.

That is why I’m making a lemon-avocado cake. It’s a cake that uses avocado instead of butter, (you follow me?) with a lemon glaze on top. There is a good chance I’ll add the tiniest bit of lemon extract just because I want it to be extra lemon-y not because there’s anything to cover up. Avocado offers no taste, so don’t be afraid of this slightly green lemon cake! I adapted the cake from Naïve Cook Cooks . I added some vanilla and lemon extract to the cake because it was fairly bland. You may consider adding a little more vanilla, to taste. This could increase the bake time, as it did in my case!

The lemon glaze is from Martha Stewart.


Ingredients:

1 ¼ cup of sugar

4 eggs

1 teaspoon vanilla extract

½ teaspoon lemon extract

½ teaspoon of salt

1 cup ripe avocado (I used 1 ½ large avocados)

2 cups flour (sifted)

1 ½ tsp baking powder


Ingredients for the glaze:

2 cups of powdered sugar

3 to 4 tablespoons of lemon juice


  1. Preheat oven to 335 degrees.
  2. Prepare a loaf pan with cooking spray so the cake doesn’t stick.
  3. In a mixing bowl, combine sugar and eggs. Mix for about 5 minutes.
  4. Meanwhile prepare the avocadoes. Get together one cup worth of avocado and mash it up and stir until as smooth as possible, try to get rid of all lumps by mixing.
  5. In another bowl, sift together the flour and baking powder.
  6. Add the avocado to the sugar and egg mixture. Mix until smooth.
  7. Add vanilla and lemon extract and the salt, to the avocado mixture.
  8. Slowly add the flour mixture mixing in between.
  9. Pour the now fully combined mixture into the loaf pan.
  10. Bake for around 55 minutes to an hour. Please be aware that the original recipe called for a bake time of 40-45 minutes, with my adjustments, it required a longer bake time.
  11. Remove from oven when a toothpick inserted in the middle of the cake comes out clean.
  12. Allow cake to completely cool.
  13. The Glaze: in a clean mixing bowl, combine powdered sugar and lemon juice.
  14. With the cake now completely cool, its time to apply to glaze. You have two options:

*Pour the glaze directly over the top of the cake so it’s nicely covered

Or

*Use a wooden skewer to poke holes all over the top (Yes, a Poke Cake!),                             then pour the glaze over the top so that it fills the holes. This is a good                           option to make sure each bit includes a little bit of icing.

  1. Allow glaze to harden over the top for best results, at least two hours (refrigeration could speed this up.)

Colorado: Peach Crisp

19553391_10211016452940644_2012168535_n

The flight from Colorado I took as a kid was my personal hell. I was deathly afraid of planes and found out the hard way about how horrible the turbulence is over the mountains. We were on the smallest plane I’ve ever been in and was like riding a bell curve. My mom had to ask the flight attendant to sit with me while she used the restroom. Yes, I was obnoxiously terrified of flying (and am no reasonable terrified).

Colorado was, however, a lot of fun. We went to Telluride as a mini family reunion. One of the things I remember most was getting altitude headaches with my cousins just going between floors of the three-story mountain home. Which, made me ask the professionals (i.e. my Dad) how does altitude affect cooking and baking?

A lot. The answer is a lot. Most people prefer to cook on induction stoves and have to get creative when adapting recipes. This helped me come up with what recipe I should do.

First things first, every single article, post, or recipe collection, only gives Colorado edibles (Pot incorporated recipes). While that is hilarious, and in some ways accurate (they have a thriving edibles business, I hear) it doesn’t really capture the day-today baking go-to in Colorado. Also, recreational marijuana is not legal in Michigan and I do not care to break any laws. I know. I’m the lamest 24 year old you have ever met. I did consider putting Colorado aside until such time that I may be there for a visit (or other legal states) so I could actually try baking edibles for myself. However, the Denver Post is pissed that people are only letting Colorado be known as the pot state in these dessert-for-every-state collections. They suggested parfait. I thought that was lame, so I came up with this (based on actual feedback from people who live in Colorado.)

Colorado has amazing peaches, specifically the Palisades Peach. Apparently any peach dessert is good enough to represent this state. I also really liked that this wasn’t the most obvious dessert choice. I had no idea that Colorado has this peach thing going, but Colorado knew! So that’s why it’s a great representation. Sorry to other states that are also super into their own peaches (Georgia, Delaware, etc…)

So what recipe to do?! It’s summer time and a great cobbler, crumble, or crisp seemed ideal. I thought of the more rustic, cowboy, mountain-y part of Colorado, and thought, why not do a fire baked peach recipe? I found this recipe by a Pretty Life in the Suburbs and ran with it.

The original recipe says it makes 6 servings. I know I didn’t add enough peaches to my own (I didn’t buy enough!) but I can’t see this serving more than 4 people.

Tell Minnie “thank you” for supervising the bake:

19576116_10211016452860642_888980416_n

Serve this with vanilla ice cream. It’s great. Pass it on.


Layer 1 Ingredients:

5 cups of chopped peaches

¼ cup of sugar

2 tablespoons lemon juice


Layer 2 Ingredients:

2/3 cup of flour

2/3 cup of rolled oats

½ cup of brown sugar

1/3 cup of melted butter

pinch of salt


Directions

  1. Mix together the ingredients of “Layer 1” in a mixing bowl.
  2. In a separate bowl, mix together the ingredients of “Layer 2”
  3. Take a big piece of aluminum foil. Fold together so all the edges are sealed
  4. Form this foil into a bowl shape.
  5. In the bowl, pour the contents from “Layer 1.” Be sure that you have walls high enough so it doesn’t spill out.
  6. Pour the mixture for “Layer 2” on top.
  7. Pinch the sides of the bowl together until the top is sealed and covered, making sure there are no leaks.
  8. Add more foil over the top if needed to create a better closure. Make sure you have easy access to the opening on top in case you want to check on the baking process
  9. Over a low campfire flame, place your foil bowl on top of a rack over the flames.
  10. Cook for 45-60 minutes, depending on heat (and altitude!)
  11. If you like your crisp a little crispy, then you might consider opening the top of the package for the final 10 or so minutes to let it dry out a little. The is based on your preference.


19621551_10211016505861967_2137896038_n


Arkansas: Possum Pie


I started writing this post and realized the only thing I know about Arkansas is that I always read Arkansas as “Arkan-Sauce,” which my second grade teacher told us was extremely impolite to actually say to someone from Arkansas.

So I’ll just get right to the recipe, which is Possum Pie. I was delighted that this was considered a classic in this state, as only a Midwesterner would (read: hillbilly recipe). When I plugged in my normal search into Pinterest, though, this is truly what came up. In fairness, we all have our weird desserts. In the Midwest we have Puppy Chow, for example.

This has been my favorite recipe yet, possibly because everything was instant and could not have been easier to make. I stuck pretty much to the classic recipe, but I have to admit I added some chopped up dark chocolate and I didn’t add pecans because I ran out, sorry! The chocolate added great texture and contrast to the not-so-chocolate-y pudding combination. My testers all said this would be even better with a peanut butter layer, someone notify Arkansas! This recipe was adapted from Taste of Home.

19511783_10210984951473127_87874123_n

Ingredients:

9 inch graham cracker crust

6 ounces of cream cheese

¾ cup of powdered sugar

pinch of salt (optional)

¼ cup of chopped pecans (optional topping)

1 ¾ cup of cold milk

2/4 teaspoon vanilla extract

¼ cup of vanilla instant pudding mix

1/3 cup of chocolate instant pudding mix

½ cup dark chocolate (chopped)

½ heavy whipping cream (topping)

Directions

  1. Mix powdered sugar and cream cheese until smooth.
  2. Place this mixture into the graham cracker crust.
  3. In a clean mixing bowl, whisk vanilla and chocolate instant pudding mixes with milk.
  4. Add vanilla extract and pinch of salt, combine.
  5. Let rise for about two minutes (so it looks like pudding)
  6. Add the optional chopped chocolate.
  7. Apply over the cream cheese in the graham cracker crust.
  8. Add the optional pecans now, or later on top of the whipped cream.
  9. Refrigerate for at least four hours (mine sat overnight)
  10. Whip up the heavy cream.
  11. Before serving, you can apply the heavy whipped cream over the whole pie so you have a nice layered look when you cut in. Or you can apply a generous dollop to each slice before serving.

19489588_10210984950153094_359461038_n.jpg

Alabama: Alabama Lane Cake Bars

I knew little to nothing about Alabama before starting this, (aside from it being the birth place of Beyonce’s dad.) While that does make it a sacred place, I was willing to bet it had even more to offer. I’ve never visited the state, save for passing through on a long road trip. Friends have praised the lovely beaches of the Gulf shore, and of course, the food.

A quick Google search made it extremely obvious that there is one dessert that stands above the rest in this state. That would be the Alabama Lane Cake. It’s hard to argue, Lane Cake was featured in Harper Lee’s To Kill a Mockingbird, in fact, some consider it to be the Lane Cake’s claim to fame.

According to “American Masters” (http://www.pbs.org/wnet/americanmasters/harper-lee-the-cake-that-made-maycomb-famous-the-lane-cake/2533/) on PBS, the Lane Cake, was realized by Emma Rylander Lane, and earned her the title of first prize at the county fair. Later on, Lane published the recipe in 1898 in the pages of her cookbook, Some Good Things to Eat. I hoped to corroborate this legend, but unfortunately, there’s little information on the mother to this dessert. It really is too bad, as Lane, should be celebrated in her state for her accomplishments.

There’s plenty of room to deviate from this recipe, if needed. Modern Lane Cakes are going with the trendy “naked” look, i.e. no frosting. In looking over this recipe and researching it, apparently the key to a great Lane cake in booze, and lots of it, but you don’t have to add it.

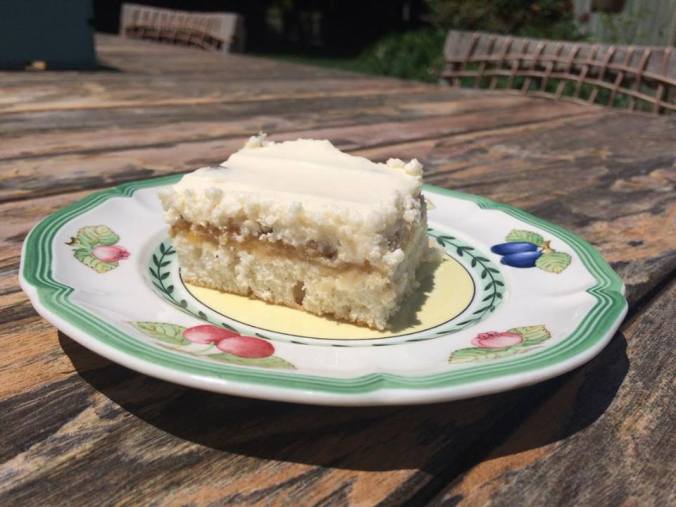
This cake nearly killed me. I did not read the recipe thoroughly and obviously this led to crisis after crisis. It took me hours and hours to make this cake simply because I’m sloppy. I made two major adjustments to this cake. One, I made them into bars instead of a layer cake. Why? Because when you bake as often as I do, it’s not that easy to find cake-eaters. Two, instead of the classic boiled icing, I made a bourbon frosting. Why? Well, I wasted a lot of eggs trying to fix this thing and I didn’t have it in me to make an egg-based frosting. In addition, I was under a time crunch and we all know how fast it is to whip up a buttercream.

To help avoid confusion, I’m going to break this down into three parts: The cake, the filling, and the frosting. I will separate each by ingredients and its accompanying directions. I used a modified recipe from Tori Avery for the cake and filling (I divided her recipe by ¼). I used a bourbon buttercream recipe from MyRecipes.com


The Cake

Ingredients

¾ cup of sifted flour

1 tsp baking powder

pinch of salt

pinch of ground nutmeg

½ cup of sugar

¼ cup of butter

½ tsp vanilla extract

¼ cup of milk

2 large egg whites


Directions

  1. Grease a 9X9 inch pan and preheat the oven to 350 degrees.
  2. In a separate bowl, sift together flour, salt, nutmeg, and baking powder.
  3. In a mixing bowl, beat the butter until nice and smooth.
  4. Slowly add the sugar to the butter until a nice fluffy mixture comes together.
  5. Add vanilla to the sugar and butter.
  6. Slowly add the flour and mixture and milk and mix until well incorporated.
  7. Get your egg whites and READ CAREFULLY.
  8. In a clean bowl, whisk together the egg white until soft peaks form. This could be tricky with such a small amount of liquid. I wasted an egg just to get it to fluff up and then dispose of one third of it.
  9. Fold together the fluffled egg whites and the rest of the batter, to this gently.
  10. Pour the batter into your prepared pan. Make sure it consistently covers your pan.
  11. Bake for 20-25 minutes. Utilize the toothpick test.
  12. Set aside and let cool.


The Filling

Ingredients (if the filling sounds appealing, feel free to double it, mine was a little sparse)

2 large egg yolks

1/3 cup of white sugar

2 tbs of butter

pinch of salt

2 tbs of bourbon

¼ tsp of vanilla extract

¼ cup of chopped raisins

¼ of finely chopped pecans

¼ of shredded coconut


Directions

  1. In a saucepan, (over light heat) beat together two egg yolks. (I accidentally let them scramble and had to start over).
  2. Incorporate sugar until smooth and not grainy.
  3. Up the heat a little and add salt and butter. This should be mid-level heat.
  4. Stir mixture for several minutes until your wooden spoon has a thick layer of the mixture on it. Be careful here and make sure your eggs are well cooked.
  5. Do not allow mixture to boil.
  6. Remove from heat.
  7. Add vanilla and bourbon.
  8. Add the pecans, coconut, and raisons.
  9. Cool the mixture at room temp for about 30 minutes before applying it to the cooled cake.


The Frosting (Bourbon Frosting)

If you want to do the real frosting, use Tori Avery’s Alabama Lane Cake recipe on her website.


Ingredients

½ cup of butter (room temperature or softened)

2 ¼ cups of powedered sugar

2 ½ tbs of bourbon

2 ½ tbs milk

½ tbs of vanilla


Directions

  1. Mix butter in bowl until smooth.
  2. Add the powdered sugar, mix until smooth.
  3. Slowly add the bourbon, milk, and vanilla, mixing thoroughly between.
  4. This will make a thinner frosting.


Assembly

  1. Spread the cooled filling over the cooled cake. There isn’t a lot of filling so spread as evenly as possible. If you made extra filling, this will be easier.
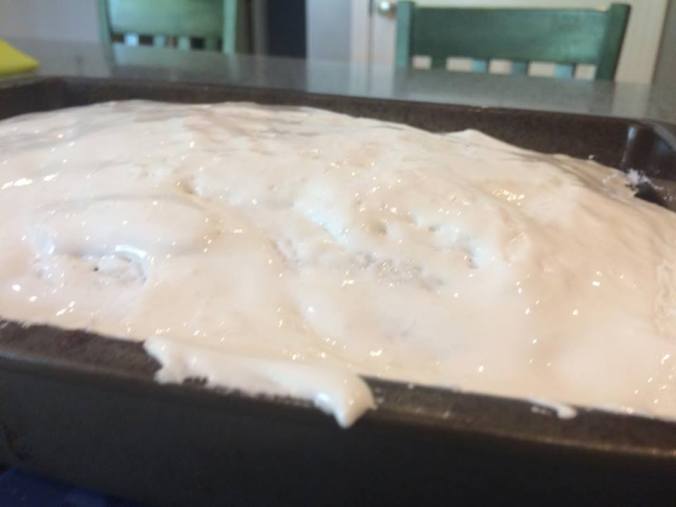
  2. Spread the bourbon frosting over the filling.
  3. I recommend chilling it so that it’s easier to cut. This made around 16 servings but feel free to cut how you please.

The cake:

The filling:

The frosting and application:

19458397_10210973411904645_860632826_n

Georgia: Coke Cake

19433681_10210957778753826_1883931245_n

I’ve been to Georgia twice. The first was to visit my cousins in Atlana and was pretty much limited to us messing around at their house. The second time was a day trip to Savannah when we were vacationing in South Carolina. Savannah is gorgeous. Its historic, its beautiful, and feels a little magical. Since we were only there for a few hours we really just had a chance to walk around and see the house that belonged to the found of the Girl Scouts (#ScoutLife).

The real reason we were there was to go to Paula Deen’s restaurant. My dad has worked with Paula a number of times professionally and she always was telling him to check out her restaurant. If you’re looking for the real deal southern food, look no further. While the food was great, the best part was the Flapjack Boys (or something similar? It was about eight years ago) They were just guys walking around liberally delivering flapjacks (which is actually more of a biscuit to us Northerners). People would just yell for more and within seconds fresh flapjacks were at the table. Sounds dreamy, right?

Now to the dessert. The first thing I thought of when thinking of Georgian foods was pecans and peaches. However, a lot of other states have a thing for peaches and pecans, too. So I went to Pinterest and typed in “Georgia Baking Classics.” And that is how I found Coke Cake (Coka-Cola). The Coke headquarters are in Georgia and Coke is kind of a big deal there. The other thing that made me want to make this cake was that it felt pretty authentic. I could see this being a classic at elementary school bake sales in Georgia.

Obviously I was intrigued, cooking with Coke. Then I read the recipe. Its essentially a chocolate brownie, covered in marshmallow fluff, covered in a chocolate and coke ganache. How does that not sound disgustingly enticing?

I looked around at a few recipes and landed on one from Food.Com that claims to be a copycat of the Coke Cake served at Cracker Barrel. If Cracker Barrel approves, then it’s gotta be right.

I made a few adjustments, of course. The cake was a little bland so I added a teaspoon of salt to the batter and another teaspoon to the ganache. And the big question, can you taste the Coke? Well it certainly makes things less chocolate-y. My friend and I agreed that you could taste the crispness that a bubbly bottle of Coke offers, but see for yourself. It’s a gooey, sugary pile.

Ingredients:

Cake:

2 cups of flour

2 cups of sugar

1 ts baking soda

1 cup butter

1 cup of Coke

5 ts coco powder

½ cup buttermilk

2 eggs

1 ts vanilla

First Frosting Layer

7 ounces of marshmallow fluff

Second Layer

½ cup butter

3 tbs cocoa powder

9 tbs of Coke

1 ts vanilla

4 ¼ cup powdered sugar


  1. Preheat oven to 350 degree.
  2. Start the Cake: whisk flour, sugar, and baking soda.
  3. In a pot on the stove, combine butter, coke, and coco until melted together.
  4. When fully combined, pour over the flour mixture and combine with whisk or whisk attachment.
  5. Add the buttermilk
  6. Add the eggs and vanilla
  7. Optional: add 1 ts of salt
  8. In a 9×13 pan (make sure it’s deep!) that has been greased (Pam or butter) pour the mixture into the pan
  9. Place in the oven, bake for 35-40 minutes. Remove when toothpick placed in the center comes out clean.
  10. When the cake has about ten minutes left, begin preparing the chocolate frosting.
  11. Put powdered sugar in mixing bowl.
  12. In a pot over the stove combine the butter, Coke, and cocoa. Combine to the point of boiling.
  13. Remove from heat; add the vanilla.
  14. Combine it with powdered sugar.
  15. When cake is done, remove from oven and immediately apply the marshmallow fluff (store bought is fine—mine was expired . . .) The marshmallow will spread very easily due to the heat from the brownies.
  16. After marshmallow fluff is evenly applied, slowly and evenly pour the chocolate ganache. You may not use all the ganance if in danger of overfilling your pan.
  17. Let sit for an hour before serving. (I refrigerated it, which made cutting much easier.


Cake Assembly:


First Layer

19415896_10210957778913830_268223174_n


19265165_10210957778713825_59388947_n

Florida: Key Lime Pie

Oh, Florida. My friend and I keep a running list of all the reasons we dislike Florida. It’s mostly based on the environment and only partially based on stereotypes of it’s residents. In my defense, all of my favorite TV shows have dedicated great jokes to their disdain of Florida and sometimes covering several episodes (including but not limited to: The Office, Brooklyn 99, Bob’s Burgers, The Unbreakable Kimmy Schmidt, and 30 Rock). Actually last night I was watching the newest Expedition Unknown on the Travel Channel and even they got in on the fun.

downloadgiphy

Screen Shot 2017-06-20 at 1.33.00 PM

imagesVjzdRgB

These weren’t even the best memes/gifs truly available. Honestly.  I love that                         Gene and Tracy essentially make the same joke.

I nearly made this a two-part post. One being the serious recipe, and one being something like Gatorade Brownies. Hilariously, there are only recipes for Gatorade jello-shots. Before you get mad at me for making fun of Florida, I recognize that this state has popularized the famous Key-Lime Pie, names for the Florida Keys.

I made this for Father’s Day, as Key-Lime Pie is one of my dad’s favorite desserts. I was letting it set up in the fridge and remarked how easy it is to make, to which my dad said “Not if you’re making an authentic one.”

So what is an authentic Key-Lime Pie? Honestly, I’m not sure, but they key seems to be key-lime juice, the higher quality the better. I had a hard time finding this product in my local grocery store but eventually found it squeezed in amongst some fruit juices. Back to authenticity, after searching the internet on my phone, I found that the recipe I used matched up pretty nicely to sites that claimed to have the most authentic recipe. So I rubbed it in my dad’s face and he agreed when he ate it, this sh*t is authentic.

I also learned key-lime pie is not green, as it did not come out green . . .

19427734_10210938083621460_70649654_n

I used a recipe from epicurious.com (love them). The only change I made was not making the graham cracker crust from scratch. I am shameless in avoiding making a pie crust.

Shoutout to Minnie who was helping me in the kitchen despite recovering from her recent spay!

19415712_10210938083821465_1260316888_n

Ingredients

Premade 9 inch graham cracker crust

4 egg yolks

14 ounces of sweetened condensed milk

½ cup plus 2 tbs of key lime juice

Heavy Cream (for whipped cream topping)

Preheat oven to 350 degrees

  1. In a mixing bowl, combine the sweetened condensed milk and the egg yolks
  2. Add the juice and mix with the whisk attachment, this will cause it aerate and fluff up a little bit
  3. Pour the mixture into the pie crust, be sure you’ve removed all the paper and plastic packaging materials first
  4. Bake in the oven for ten minutes. Mine went a bit longer and was closer to fifteen minutes, keep a close eye!
  5. Remove from oven and let cool for at least 30 minutes before moving it to the fridge so it can stiffen up a little. The recipe I worked from suggested 8 hours, which is ideal, though mine was probably only about 4 hours
  6. In a mixing bowl, whip desired amount of heavy cream until classic stiff peaks form, this has no sugar; the whipped cream should compliment the tartness of the pie
  7. Top with whipped cream and enjoy!

19433660_10210938083741463_1816189919_n

Alaska: Akutuq or Eskimo Ice Cream

19369587_10210921669811125_828338649_n

One of my favorite trips as a child was a cruise around Alaska. It was a momentous trip for a preschooler—I watched Titanic for the first time on the flight (which was not the best entertainment for a child going on their first cruise). The wildlife was impressive; I nearly touched a whale during a whale watching tour, and saw my first bear. However, what many in my family best recall about this trip was I got my first taste of chocolate milk. It was love at first sip. I had it with every meal on the cruise, until of course I realized I’d had too many. My dad valiantly carried me out of the dining room but his efforts were too little too late—I got sick down the back of his shirt. Understandably there was no more chocolate milk after that.

You may be surprised that the culinary classic Baked Alaska is not the recipe I chose. But I have two good reasons. One, Baked Alaska in no way represents it’s namesake. There are many theories as to its beginnings but its precursor was likely French in origin. Ultimately, it was popularized in the United States to celebrate the Alaskan territory joining the United States. So, if anything it’s a patriotic dessert more than a state dessert. The second reason is that I find Baked Alaska tedious unless you’re a professional or an extremely ambitious amateur.

Which is how I found out about Eskimo Ice Cream, or Akutuq. This dessert goes way back to indigenous Alaskans. It was a hefty meal packed with nutrients. A tough mix of animals fats (seal, caribou, fish, bear, etc), and a variety of readily found berries, it may take a particular taste pallet to enjoy. Fortunately, modern adaptions have been made to sweeten this dish up. It should be noted that this recipe is by no means “authentic” to indigenous Alaskans. I encourage those interested to find authentic recipes that use animal fats and original techniques. However, if you don’t want to eat caribou fat ice cream, then you can settle for the following adaptation.

I followed a recipe from Spoon University, but I had some pretty rough goes.

(Not correct at all)

This led me to reading several other recipes and coming up with a take that seemed to work best. I think it’s safe to say this is more of an “inspired by” take on Akutuq. By the time it was finished it reminded me of an amazing dessert I had in Normandy France. It was just crème fraiche, berries, and topped with a little sugar. Which means I likely strayed pretty far from Akutuq.

Essentially, just whip everything together. That’s what ended up working. At the end of it, it tasted amazing, and we topped with whipped cream (I know, we really should not have, but it tasted amazing!) You can use any berry you’d like. I chose blueberries, blackberries and raspberries. I tried to stay true to what berries might be found in Alaska and what was in season here in Michigan.

Ingredients:

1 cup of Crisco all vegetable shortening

1 cup of sugar

1/4 cup of water

1 pint of blueberries (rinsed)

1/2 pint of blackberries (rinsed)

1/2 raspberries (rinsed)

  1. Whip together crisco and sugar until well combined and fluffy.
  2. Add the water. You can add a little more if you want the berries to have a frozen crunch.
  3. Add the berries. Be careful not to over mix or else you’ll have a jam sort of mixture.
  4. Pour into a freezer safe container. Cover in plastic wrap pressed into the mixture. Top with a lid.
  5. Let freeze until hardened, this could be several hours.
  6. You may want it to set out from the freezer a few to several minutes to soften slightly and to make it easier to serve. We found that the colder it was the better.

You can be like us and top with whipped cream if you choose. We liked it best with whipped heavy cream (no additional ingredients.)

Arizona: Sopapillas

19142345_10210868562363472_950049909_n

Arizona is known for cactuses, the Gold Rush, and accidentally coming up in my Google searches because I mistakenly typed “desert” instead of “dessert.” Arizona is also home to an ancient culture, the Navajo. Sopapilla is often likened to traditional Navajo “Frybread.” It can be served sweet or savory, and often used to accompany a dish to get every last bit of sauce, much like a gravy biscuit.

The Sopapilla as a dessert can be served with a honey or anise sauce, (or chocolate, if you please), and alongside ice cream and whipped cream. They are usually a pillow-y shape, or sometimes a triangle. New Mexico residents will be quick to point out that Sopapilla is just as popular in their home, but it can be difficult to assign South-Western foods to just one state!

I chose to make this an oven baked Sopapilla rather than the traditional fried recipe. I don’t know many people with their own fryer, so this seemed like a practical compromise. If you do have a fryer, there are plenty of delicious recipes out there that I encourage you to try.

This recipe has been adapted from WellFloured.com. I provided my troubleshooting advice. Don’t be afraid to try to correct when a recipe doesn’t come out just right. Nothing is perfect, especially not the shape of my sopapillas triangles. While working my way through this, and commenting at the lack of uniformity in my triangle shapes, my mom commented, “Well they smell great. What’s not to love about butter, sugar, and cinnamon?”

At the bottom, you can view the process in photos! Because baking is hard and                   pictures are nice.

Your ingredient list:

1 cup of flour

½ tsp of salt

1 tsp baking powder

¼ tsp cinnamon

2 tbs of butter

2/3 cup of water

6 tbs of butter

For coating

½ tsp of cinnamon

¼ cup of sugar (combined evenly with cinnamon)

  1. Add together the dry ingredients (flour, salt, baking powder, and cinnamon) combine thoroughly.
  2. Next add 2 tbs of butter, straight from the fridge. I recommend cutting the pieces up well so it has a chance to combine with the dry ingredients.
  3. Add the 2/3 cup of water. This will help the butter and dry ingredients bind. Again, be sure it is thoroughly mixed.
  4. Allow the dough to rest for fifteen minutes (covered).
  5. While the dough is resting, prepare the pan and the coating.
  6. Preheat the oven to 400 degrees.
  7. Melt the 6 tbs of butter and pour onto a rimmed cookie baking sheet. A pizza sheet will not work, you’ll loose the butter and have an icky mess.
  8. Meanwhile, in a good-sized bowl, combine the ½ tsp of cinnamon and the ¼ cup of sugar. You want the bowl large enough so that when you dunk your baked sopapillas, they’ll get completely coated.
  9. Now that your dough is done resting, place it on a lightly flour work surface, like a large cutting board.
  10. Form the dough into a disk shape (like a pizza) then cut into desired size portioned triangles. I ended up making twelve.
  11. In your baking sheet covered in melted butter, place the dough triangles so they sit in a pool of butter.
  12. Bake for 4-5 minutes. It may be longer or shorter based on the strength of your oven.
  13. Pull the pan out and flip the triangles over to the unbaked side, these will be hot so use a tool!
  14. Put back in the oven for another 4-5 minutes (again, give or take depending on your oven)
  15. Pull from the oven once they look nicely toasted and golden brown.

    Note: If they don’t seem browned enough, melt a little more butter and coat the                   tops of the triangles, then put them back in the oven for a few minutes, checking                 frequently. Flip and repeat on the reverse side. This seemed to be the trick for                     me!

  1. Allow them too cool for a short time. Then, when just cool enough to handle, coat the pieces in the cinnamon sugar mixture.


19142055_10210868562323471_1859679349_n